Linux默认启动采用init进程,init进程是所有进程的父进程
sudo /etc/init.d/apache2 start
service apache2 start
上述启动方式缺点:
- 启动时间长,init进程是串行启动,即按顺序一个接一个的启动
- 启动脚本复杂,init进程只是执行启动脚本,不管其它事情,脚本需要自己处理,这使得脚本变得很长
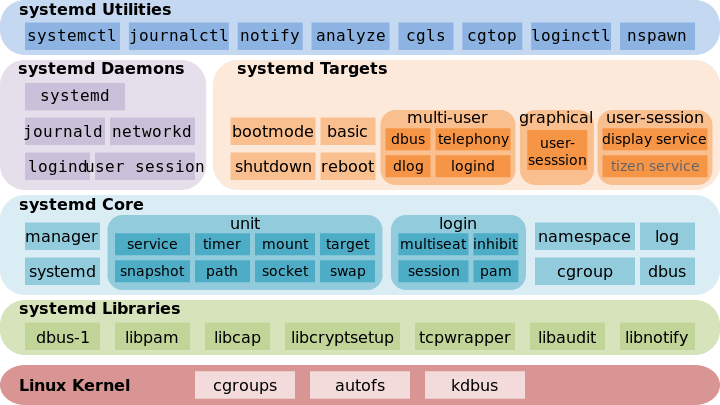
Systemd 就是为了解决init方式启动的问题诞生的.他的设计目标是,微系统启动和管理提供一套完整的解决方案
根据linux管理字母d (daemon)是守护进程的缩写.Systemd,的含义就是整个系统的守护进程. 作者Lennart Poettering
| 任务 | 旧指令 | 新指令 |
|---|---|---|
| 使某服务自动启动 | chkconfig –level 3 httpd on | systemctl enable httpd.service |
| 使某服务不自动启动 | chkconfig –level 3 httpd off | systemctl disable httpd.service |
| 检查服务状态 | service httpd status | systemctl status httpd.service (服务详细信息) systemctl is-active httpd.service (仅显示是否 Active) |
| 显示所有已启动的服务 | chkconfig –list | systemctl list-units –type=service |
| 启动服务 | service httpd start | systemctl start httpd.service |
| 停止服务 | service httpd stop | systemctl stop httpd.service |
| 重启服务 | service httpd restart | systemctl restart httpd.service |
| 重载服务 | service httpd reload | systemctl reload httpd.service |
常用命令
Systemd 并不是一个命令,而是一组命令,涉及到系统管理的方方面面
$ systemctl --version //查看版本

$ systemctl --version
systemd 237
+PAM +AUDIT +SELINUX +IMA +APPARMOR +SMACK +SYSVINIT +UTMP +LIBCRYPTSETUP +GCRYPT +GNUTLS +ACL +XZ +LZ4 +SECCOMP +BLKID +ELFUTILS +KMOD -IDN2 +IDN -PCRE2 default-hierarchy=hybrid
systemctl 是systemd的主命令,用于管理系统
$ sudo systemctl reboot //重启系统

$ sudo systemctl poweroff //关闭系统 切断电源

$ sudo systemctl halt //cpu 停止工作

$ sudo systemctl suspend //暂停系统

$ sudo systemctl hibernate //让系统进入冬眠状态

$ sudo systemctl hybrid-sleep //让系统进入交互式休眠状态

$ sudo systemctl rescue //启动进入救援状态 单用户状态
一旦修改配置文件,就要让 SystemD 重新加载配置文件,然后重新启动,否则修改不会生效。
$ sudo systemctl daemon-reload
$ sudo systemctl restart httpd.service
systemd-analyze 分析启动进程
# systemd-analyze
Startup finished in 487ms (kernel) + 2.776s (initrd) + 20.229s (userspace) = 23.493s
systemd-analyze blame 分析启动时各个进程花费的时间
# systemd-analyze blame
8.565s mariadb.service
....
systemd-analyze critical-chain 分析启动时的关键链
# systemd-analyze critical-chain
The time after the unit is active or started is printed after the "@" character.
The time the unit takes to start is printed after the "+" character.
multi-user.target @20.222s
└─mariadb.service @11.657s +8.565s
......
systemctl list-unit-files 列出所有可用单元
# systemctl list-unit-files
UNIT FILE                                   STATE
proc-sys-fs-binfmt_misc.automount           static
.....
systemctl list-units 列出所有运行中单元
# systemctl list-units
UNIT                                        LOAD   ACTIVE SUB       DESCRIPTION
proc-sys-fs-binfmt_misc.automount           loaded active waiting   Arbitrary Executable File Formats File Syste
evices-pl...erial8250-tty-ttyS2.device loaded active plugged
...
systemctl list-units 列出所有失败单元
UNIT          LOAD   ACTIVE SUB    DESCRIPTION
kdump.service loaded failed failed Crash recovery kernel arming
...
systemctl is-enabled crond.service 检查某个单元(如 cron.service)是否启用
# systemctl is-enabled crond.service
enabled
systemctl kill httpd 使用systemctl命令杀死服务
# systemctl kill httpdsystemd-cgtop 按CPU、内存、输入和输出列出控制组
# systemd-cgtop
Path                                                              Tasks   %CPU   Memory  Input/s Output/s
/                                                                    83    1.0   437.8M        -        -
/system.slice                                                         -    0.1        -        -        -
...
查看日志
Systemd 统一管理所有 Unit 的启动日志
journalctl命令,查看所有日志(内核日志和应用日志)
日志的配置文是/etc/systemd/journald.conf
#排错常用
#-xe是排查问题时最常用的参数:
#-e 从结尾开始看
#-x 相关目录(如:问题相关的网址)
sudo journalctl -xe

#查看所有日志(默认情况下 ,只保存本次启动的日志)
$ sudo journalctl

# 查看内核日志(不显示应用日志)
$ sudo journalctl -k

# 查看系统本次启动的日志
$ sudo journalctl -b
$ sudo journalctl -b -0

# 查看上一次启动的日志(需更改设置)
$ sudo journalctl -b -1

# 查看指定时间的日志
$ sudo journalctl --since="2012-10-30 18:17:16"
$ sudo journalctl --since "20 min ago"
$ sudo journalctl --since yesterday
$ sudo journalctl --since "2015-01-10" --until "2015-01-11 03:00"
$ sudo journalctl --since 09:00 --until "1 hour ago"

# 显示尾部的最新10行日志
$ sudo journalctl -n

# 显示尾部指定行数的日志
$ sudo journalctl -n 20

# 实时滚动显示最新日志
$ sudo journalctl -f

# 查看指定服务的日志
$ sudo journalctl /usr/lib/systemd/systemd

# 查看指定进程的日志
$ sudo journalctl _PID=1

# 查看某个路径的脚本的日志
$ sudo journalctl /usr/bin/bash

# 查看指定用户的日志
$ sudo journalctl _UID=33 --since today

# 查看某个 Unit 的日志
$ sudo journalctl -u nginx.service
$ sudo journalctl -u nginx.service --since today

# 实时滚动显示某个 Unit 的最新日志
$ sudo journalctl -u nginx.service -f

# 合并显示多个 Unit 的日志
$ journalctl -u nginx.service -u php-fpm.service --since today

# 查看指定优先级(及其以上级别)的日志,共有8级
# 0: emerg
# 1: alert
# 2: crit
# 3: err
# 4: warning
# 5: notice
# 6: info
# 7: debug
$ sudo journalctl -p err -b

# 日志默认分页输出,--no-pager 改为正常的标准输出
$ sudo journalctl --no-pager

# 以 JSON 格式(单行)输出
$ sudo journalctl -b -u nginx.service -o json

# 以 JSON 格式(多行)输出,可读性更好
$ sudo journalctl -b -u nginx.serviceqq
 -o json-pretty

# 显示日志占据的硬盘空间
$ sudo journalctl --disk-usage

# 指定日志文件占据的最大空间
$ sudo journalctl --vacuum-size=1G

# 指定日志文件保存多久
$ sudo journalctl --vacuum-time=1years
相关文章