PHP实现守护进程的方式

nohup

nohup命令 可以将程序以忽略挂起信号的方式运行起来,被运行的程序的输出信息将不会显示到终端。

无论是否将 nohup 命令的输出重定向到终端,输出都将附加到当前目录的 nohup.out 文件中。如果当前目录的 nohup.out 文件不可写,输出重定向到$HOME/nohup.out文件中。如果没有文件能创建或打开以用于追加,那么 command 参数指定的命令不可调用。如果标准错误是一个终端,那么把指定的命令写给标准错误的所有输出作为标准输出重定向到相同的文件描述符。

语法

nohup(选项)(参数)

选项

--help:在线帮助;
--version:显示版本信息。

参数

程序及选项:要运行的程序及选项。

实例

使用nohup命令提交作业,如果使用nohup命令提交作业,那么在缺省情况下该作业的所有输出都被重定向到一个名为nohup.out的文件中,除非另外指定了输出文件:

nohup command > myout.file 2>&1 &

在上面的例子中,输出被重定向到myout.file文件中。

该指令表示不做挂断操作,后台下载

nohup wget site.com/file.zip

下面命令,会在同一个目录下生成一个名称为 nohup.out 的文件,其中包含了正在运行的程序的输出内容

nohup ping -c 10 baidu.com

PHP示例

nohup xxx.php &

使用pcntl和posix扩展实现

PHP 实现守护进程

  • fork 子进程
  • 父进程退出
  • 设置新的会话
  • 重置文件掩码
  • 关闭标准输入输出
<?php
// Fork the current process
$pid = pcntl_fork();

// If pid is negative, an error occurred
if ($pid == -1) {
    exit("Error forking...\n");
} 
// If pid is 0, this is the child process
elseif ($pid === 0) {
    // Make the child process a new session leader
    if (posix_setsid() === -1) {
        exit("Error creating new session...\n");
    }
    
    $dir = '../../../vendor/mydaemon.log';
    // Open a log file for writing
    $log = fopen($dir, 'w');

    // Loop indefinitely
    while (true) {
        // Write a message to the log file
        fwrite($log, "Daemon is running...\n");

        // Sleep for 5 seconds
        sleep(5);
    }
    
    //close the standard input, output, and error streams respectively.
    //REF:https://www.php.net/manual/zh/wrappers.php.php
    //REF:https://www.php.net/manual/zh/features.commandline.io-streams.php

    fclose(STDIN);
    fclose(STDOUT);
    fclose(STDERR);
} 
// If pid is positive, this is the parent process
else {
    // Exit the parent process
    exit('Exit the parent process');
}

Laravel 踩坑记录之路由与中间件,论规范的重要性

使用一种技术,就要遵循它的规范,尤其是在没有完全了解实现原理的时候,不能随意的DIY否则就会进入坑中

不明原因(可能的原因同事对框架做了修改)导致在控制器构造方方中使用$this->middleware()方法,terminate中间件没有生效,最后在路由中使用->middleware() 方法中间件生效

php-fpm 配置指南

简介

FPM(FastCGI 进程管理器)用于替换 PHP FastCGI 的大部分附加功能,管理PHP进程池。用于接受处理来自WEB服务器(nginx)的请求.

PHP-FPM会创建一个master进程用于管理work进程(fork或killwork进程)和转发请求。work进程会竞争的接受请求,接收成功后,解析FastCGI协议执行脚本,处理完成,等待下一个请求(同步阻塞IO)。

PHP-FPM 对于高并发的处理能力不强。高并发业务推荐使用swoole 或 workman相关生态。

配置项说明 官方文档

全局常用配置

#PID 文件的位置
pid = run/php-fpm.pid
#错误日志目录
error_log = log/php-fpm.log
#日志等级
log_level = warning
#用于设定平滑重启的间隔时间。这么做有助于解决加速器中共享内存的使用问题,可用单位:s(秒),m(分),h(小时)或者 d(天)
emergency_restart_interval = 60s
#如果子进程在 emergency_restart_interval 设定的时间内收到该参数设定进程数量的 SIGSEGV 或者 SIGBUS退出信息号,则FPM会重新启动;
emergency_restart_threshold = 30
#子进程接受主进程复用信号的超时时间
process_control_timeout = 5s
#设置 FPM 在后台运行。设置“no”将 FPM 保持在前台运行用于调试
daemonize = yes

emergency_restart 配置解释,在60s内收到30个子进程的SIGSEGV或SIGBUS退出信号,则重启fpm

process_control_timeout场景,例如当父进程发送终止信号时,子进程正在处理某些事情的时候。十秒的时间,他们会有一个更好的机会完成任务并且优雅地退出

进程池相关配置

进程池监听配置

#进程池名称
[yangliuan]
#设置进程池接受 FastCGI 请求的地址,可用格式为:'ip:port','port','/path/to/unix/socket',每个进程池都要设置
listen = /dev/shm/php-cgi.sock
listen.backlog = -1
listen.allowed_clients = 127.0.0.1
listen.owner = yangliuan
listen.group = yangliuan
listen.mode = 0666
user = yangliuan
group = yangliuan

TCP Socket 链接方式127.0.0.1:9000 ,可以跨机器通讯 ,使用 Nginx 做负载均衡做 PHP 服务器集群,应用服务器只需要安装php就可以了

Unix Socket 链接方式 /dev/shm/php-cgi.sock,只能本机通讯 ,Nginx 和 FPM 必须都在同一台服务器上,速度比较快而且消耗资源少(差距不会太大 0.1% ~ 5% 的差别),这种情况做集群的话,应用服务器需要同时安装nginx和php

/dev/shm 是linux tmpfs文件系统,数据存储和读取直接使用内存,速度快

对应nginx监听方式

fastcgi_pass 127.0.0.1:9000;
fastcgi_pass unix:/dev/shm/php-cgi.sock;

进程池模式

fpm 的运行模式有三种:ondemand 按需创建dynamic 动态创建static 固定数量

ondemand

ondemand 初始化时不会创建待命的进程。并且会在空闲时将进程销毁,请求进来时再开启。是一种比较 节省内存 的 FPM 运行方式,不过因为其频繁创建和销毁进程,性能表现不佳。

应用场景:一般是在共享的 VPS 上使用。内存小的机器上。

相关参数

#秒数,多久之后结束空闲进程;默认是 10 秒,超过 10 秒即销毁
pm.process_idle_timeout = 10s
#最大并存进程数,超过此值将不再创建
pm.max_children = 50
#每个进程最多处理多少个请求,超过此值将自动销毁
pm.max_requests = 1000

dynamic

动态创建,这个是默认选项,也是比较灵活的选项。兼顾稳定和快速响应。因为一直保证有「空闲进程」可供使用,所以 dynamic 的配置,相比 ondemand 进程要同时创建,响应速度还是比较快的。然而在还是避免不了频繁创建和销毁进程对系统造成的消耗

应用场景:一台服务器上跑多个php项目,平常访问量不多。

相关配置:

#FPM 启动时创建的进程数
pm.start_servers = 10
#最大并存进程数,超过此值将不再创建
pm.max_children = 50
#空闲进程数最小值,如果空闲进程小于此值,则创建新的子进程
pm.min_spare_servers = 10
#空闲进程数最大值,如果空闲进程大于此值,则进行清理
pm.max_spare_servers = 40
#每个进程最多处理多少个请求,超过此值将自动销毁
pm.max_requests = 1000

dynamic模式 进程数量公式

处理请求中的进程数量 + pm.max_spare_servers =  pm.max_children

超过最大进程数后,新来的请求将会阻塞等待,php-fpm日志会出现 server reached pm.max_children setting (n), consider raising it 警告日志。n为配置的pm.max_children最大进程数值

static

固定进程数量是性能最好,省去了创建和销毁进程的开销,资源利用率最高的运行方式,一般在要求单机性能最高的时候使用

应用场景:PHP 服务器集群,希望每台机器都能物尽其用;本地lnmp开发环境,保证占用内存固定

相关配置:

#FPM 启动时创建的进程数,并且会一直保持这个数
pm.max_children = 50
#每个进程最多处理多少个请求,超过此值将自动销毁
pm.max_requests = 1000

该模式需要计算评估一般场景下,每个进程占用多少内存,以及每台机器的总内存。然后根据情况配置。

使用ab压力测试工具或jmeter工具,对访问频率较高的页面和请求进行的正常流量情况下的压力测试。

然后使用如下命令进行统计,查看内存使用情况,单个php进程占用进程数

ps -eo size,pid,user,command --sort -size | awk '{ hr=$1/1024 ; printf("%13.2f Mb ",hr) } { for ( x=4 ; x<=NF ; x++ ) { printf("%s ",$x) } print "" }' | grep php-fpm

要求不严谨的情况下,可以根据经验和项目的业务场景的代码对每个进程数进行粗略估算,例如一个常用接口查询请求下占用多少内存,然后在计算。

最大进程数量计算公式

pm.max_children = 可用内存 / 每个进程暂用内存大小

可用内存不是本机所有内存,要除去其他程序运行,例如nginx,mysql,等其它服务的内存。

调试期间,要在生产环境中实战观察,一般建议使用 80% 的内存使用率,留 20% 给内存泄露的空间和其他软件运行。

最后是 pm.max_requests 值,需要我们观察应用是否有 内存泄漏。现代的 PHP 程序,尤其是 Laravel ,会依赖于非常多的扩展包,这些扩展包代码质量参差不齐,多少会出现内存泄漏的问题。如果内存泄露不严重,那么把值设置高一点,让单个进程在存活期间多处理一些请求,如果内存泄露比较严重,应当酌情设置低一点。否则会出现系统内存不够用,然后去使用 Swap 物理内存 的窘境。

如果代码质量非常高,不会出现发生内存泄露的情况,可以将其设置为 pm.max_requests=0 可以避免过高的 PM 开销

请求的生命周期设置

#设置单个请求的超时中止时间。该选项可能会对 php.ini 设置中的 'max_execution_time' 因为某些特殊原因没有中止运行的脚本有用
request_terminate_timeout = 600

非分片上传大文件时,需要用到

请求慢日志设置

#当一个请求该设置的超时时间后,就会将对应的 PHP 调用堆栈信息完整写入到慢日志中,0关闭
request_slowlog_timeout = 60
#慢日志路径
slowlog = var/log/slow.log
#慢日志记录脚本堆栈的深度
request_slowlog_trace_depth = 20

文件打开限制

#设置文件打开描述符的 rlimit 限制
rlimit_files = 51200
#设置核心 rlimit 最大限制值。可用值:'unlimited',0 或者正整数
rlimit_core = 0

worker进程开启日志记录

catch_workers_output = yes

参考

为高性能优化 PHP-FPM

PHP-FPM 调优:使用 ‘pm static’ 来最大化你的服务器负载能力

LX3 Laravel 性能优化入门

supervisor安装使用

centos

安装

方式一

yum update

yum install -y supervisor

//yum安装会自动创建systemd脚本,可用systemd管理
systemctl enable supervisord //开机自启

systemctl disable supervisord //禁用开机自启

systemctl start supervisord//启动supervisor

systemctl reload supervisord //重新加载配置

systemctl stop supervisord //停止supervisor

方式二

yum update

yum install -y python-setuptools

easy_install supervisor

echo_supervisord_conf >/etc/supervisord.conf //创建配置文件

需要自己配置systemd脚本

ubuntu

sudo apt-get install supervisor

service supervisor status|start|stop|enable|disable

常用命令

supervisord -c /etc/supervisord.conf //指定配置文件启动

supervisorctl stop programxxx  //停止某一个进程

supervisorctl start programxxx //启动某一个进程

supervisorctl restart programxxx //重启某个进程

supervisorctl status  //查看进程状态

supervisorctl stop groupworker //重启所有属于名为 groupworker 这个分组的进程(start,restart 同理)

supervisorctl stop all //停止全部进程,注:start、restart、stop 都不会载入最新的配置文件

supervisorctl reload //载入最新配置文件,停止原有进程并按新的配置启动所有进程

supervisorctl update //根据最新的配置文件,启动新配置或有改动的进程,配置没有改动的进程不会受影响而重启。

配置文件示例 (laravel项目为例)

#进程组名称
[program:laravel-worker-queue]
#进程名称
process_name=%(program_name)s_%(process_num)02d
#程序执行命令
command=/php-path/bin/php /www/www.youdomain.com/current/artisan queue:work redis --sleep=3 --tries=3 
#supervisor启动后自动启动
autostart=true 
#退出后自动重启
autorestart=true
#程序运行用户
user=www-data 
#supervisor启动进程数量
numprocs=5
#如果为true,则将进程的 stderr 输出发送回其 stdout 文件描述符上的 supervisord(在 UNIX shell 术语中,这相当于执行 /the/program 2>&1)
redirect_stderr=true
#日志大小
stdout_logfile_maxbytes=10MB
#日志数量
stdout_logfile_backups=20
#日志目录
stdout_logfile=/www/www.youdomain.com/current/storage/logs/worker.log

Laravel 迁移文件 简单总结

参考

简介

数据库迁移就像是数据库的版本控制,可以让你的团队轻松修改并共享应用程序的数据库结构。迁移通常与 Laravel 的数据库结构生成器配合使用,让你轻松地构建数据库结构。如果你曾经试过让同事手动在数据库结构中添加字段,那么数据库迁移可以让你不再需要做这样的事情。

执行 php artisan migtate 后 数据库中会生成一个迁移文件表 migrations ,每一条记录对应一个执行过的迁移文件,怎么看每次迁移了哪些文件?在 migrations 表中有一个 batch 字段,字段值相同的为同一次迁移

创建 created方法

Schema::create('users', function (Blueprint $table) {
    //...		
});

修改 table方法

数据库因为业务需要变更时,每个表的变更创建一个单独的迁移文件方便生产执行.

需要引入composer require doctrine/dbal 扩展包

Schema::table('migration_demo', function (Blueprint $table) {

});

1 对一个字段做多种修改 例如 重命名和修改类型同时进行.原字段为type 类型int

//无效方式1
Schema::table('migration_demo', function (Blueprint $table) {
    $table->bigInteger('type')->default('0')->change();
    $table->renameColumn('type', 'demo_type');
    //经测试这两号代码颠倒顺序最后生成的语句是一样的
});

执行语句, 字段重命名时又改回了默认的int类型

ALTER TABLE migration_demo CHANGE type demo_type INT DEFAULT 0 NOT NULL
ALTER TABLE migration_demo CHANGE type type BIGINT DEFAULT 0 NOT NULL
//无效方式2
Schema::table('migration_demo', function (Blueprint $table) {
    $table->bigInteger('type')->default('0')->change()->renameColumn('type', 'demo_type');
});

执行语句 ,rename并没有生效

ALTER TABLE migration_demo CHANGE type type BIGINT DEFAULT 0 NOT NULL

同一字段执行多种变更,正确的方式

Schema::table('demo', function (Blueprint $table) {
   $table->renameColumn('name', 'demo_name');
});
Schema::table('demo', function (Blueprint $table) {
   $table->string('demo_name', 255)->default('')->change();
});

执行语句结果

ALTER TABLE demo CHANGE demo_name demo_name VARCHAR(255) DEFAULT '' NOT NULL COLLATE utf8mb4_unicode_ci	
ALTER TABLE demo CHANGE name demo_name VARCHAR(20) DEFAULT '' NOT NULL

迁移文件的另一种简介执行方式,使用DB statement 执行原生DDL语句

DB::statement("ALTER TABLE `lara`.`users` CHANGE COLUMN `remember_token` `remember_tokens` VARCHAR(255) COLLATE 'utf8mb4_unicode_ci' NULL DEFAULT NULL");

总结

个人感觉这种方式适合中小型项目和公司,在有DBA的公司应该使用专业的数据库迁移工具

Laravel Telescope

参考

简介

Larave Telescope 是 Laravel 框架的官方出品的debug工具包, 5.7.7以上版本才有.

此文用来记录一些文档中没有介绍的坑点,使用技巧以及原理

安装配置参考文档

1.扩展自带数据表迁移文件,配合其它迁移文件扩展包生成时要注意

定制数据迁移

如果您不打算使用 Telescope 的默认迁移,则应该在 AppServiceProvider 的 register 方法中调用 Telescope::ignoreMigrations 方法。您可以使用 php artisan vendor:publish --tag=telescope-migrations 命令导出默认迁移。

注意:如果使用三方扩展包生成迁移文件或手动编写迁移文件时不要生成Telescope相关迁移文件,否则执行时会造成冲突

按钮功能介绍

1暂停 2刷新 3定制Tag 可以对指定Tag数据进行监控

Tag设置规则,Auth:ID 模型:ID 可以看一下 telescope_entries_tags 表中自动记录的标签。但是在环境变量设置为production后,除了Auth其它的并不好使

生产环境通过认证访问

protected function gate()
    {
        Gate::define('viewTelescope', function ($user) {
            return in_array($user->email, [
                'jordon.kub@example.com', 'njerde@example.net'
            ]);
        });
    }

设置制定邮箱或自定以其他字段的用户,前提必须使用laravel自带的用户认证功能

测试问题

参考

启用了telescope(望远镜)debug工具之后,用phpunit 跑所有测试是会报ReflectionException: Class env does not exist 错误

解决方案

You could just add <env name="TELESCOPE_ENABLED" value="false"/> to the phpunit.xml-file.
//将TELESCOPE_ENABLED false添加到phpunit.xml配置中

Laravel Config 缓存原理

参考

加载过程

  • laravel的所有配置文件都在config目录下
  • 启动时加载所有config目录下的所有配置文件
  • 通过Dotenv 类库加载.env文件中的配置项到预定义全局变量$_ENV中
  • env函数中使用getenv()来获取环境变量$_ENV中的值
  • config文件中使用env()加载配置值
  • config()函数调用config文件中的配置项

使用配置文件时要注意严格遵守约定,在config文件中调用env()函数

在路由,控制器和模型以及自定义类文件中必须使用config()函数获取配置项的值

Illuminate\Foundation\Bootstrap\LoadEnvironmentVariables;
 /**
     * Bootstrap the given application.
     *
     * @param  \Illuminate\Contracts\Foundation\Application  $app
     * @return void
     */
    public function bootstrap(Application $app)
    {
        //此处判断是否开启缓存配置,开启缓存配置直接返回缓存中的配置
        //因此开启缓存配置后,env()函数会失效
        if ($app->configurationIsCached()) {
            return;
        }

        $this->checkForSpecificEnvironmentFile($app);
        //此处加载.env中的文件
        try {
            (new Dotenv($app->environmentPath(), $app->environmentFile()))->load();
        } catch (InvalidPathException $e) {
            //
        }
    }
/**
     * Gets the value of an environment variable.
     *
     * @param  string  $key
     * @param  mixed   $default
     * @return mixed
     */
    function env($key, $default = null)
    {
        $value = getenv($key);

        if ($value === false) {
            return value($default);
        }

        switch (strtolower($value)) {
            case 'true':
            case '(true)':
                return true;
            case 'false':
            case '(false)':
                return false;
            case 'empty':
            case '(empty)':
                return '';
            case 'null':
            case '(null)':
                return;
        }

        if (strlen($value) > 1 && Str::startsWith($value, '"') && Str::endsWith($value, '"')) {
            return substr($value, 1, -1);
        }

        return $value;
    }
/**
     * Get / set the specified configuration value.
     *
     * If an array is passed as the key, we will assume you want to set an array of values.
     *
     * @param  array|string  $key
     * @param  mixed  $default
     * @return mixed|\Illuminate\Config\Repository
     */
    function config($key = null, $default = null)
    {
        if (is_null($key)) {
            return app('config');
        }

        if (is_array($key)) {
            return app('config')->set($key);
        }

        return app('config')->get($key, $default);
    }
//app('config) 生成的是 Illuminate\Config\Repository 实例

开启缓存配置

php artisan config:cache

/**
     * Execute the console command.
     *
     * @return void
     */
    public function handle()
    {  
        //调用清楚缓存命令
        $this->call('config:clear');
       //加载所有配置项
        $config = $this->getFreshConfiguration();
       //使用var_export导出php可以执行的数组
       //文件系统使用file_put_contents 生成 配文件 config.php
       //配置文件缓存目录 app/bootstrap/cache/config.php
        $this->files->put(
            $this->laravel->getCachedConfigPath(),
            '<?php return ' . var_export($config, true) . ';' . PHP_EOL
        );

        $this->info('Configuration cached successfully!');
    }

php artisan config:clear

/**
     * Execute the console command.
     *
     * @return void
     */
    public function handle()
    {   
        //laravel文件系统使用 unlink 删除 缓存的config.php文件
        $this->files->delete($this->laravel->getCachedConfigPath());

        $this->info('Configuration cache cleared!');
    }

总结

处理思想就是把多个配置文件合并成一个配置文件,减少I/0操作提升性能.

Laravel框架读写分离测试

#配置修改
 'mysql' => [
            'read' => [
                'host' => '192.168.31.194',
            ],
            'write' => [
                'host' => '127.0.0.1',
            ],
            #同一请求周期内使用相同链接获取数据
            'sticky'    => true,
            'driver'    => 'mysql',
            'database'  => 'lara',
            'username'  => 'root',
            'password'  => '123456',
            'charset' => 'utf8mb4',
            'collation' => 'utf8mb4_unicode_ci',
            'prefix'    => '',
  ],

测试代码

public function create()
    {
        dump(Order::count());
        $res = Order::create(['sn' => date('YmdHis') . mt_rand(0000, 9999)]);
        dump(Order::find($res->id), Order::count());
    }

stop slave; 关闭从库同步

sticky 为 false时

sticky 为 true时

写入之后的读取的count数为47 插入的id模型也打印成功,说明laravel在写入操作之后使用的是写连接.

源码分析

Illuminate\Database\Connection.php

/**
     * Get the current PDO connection used for reading.
     *
     * @return \PDO
     */
    public function getReadPdo()
    {
        if ($this->transactions > 0) {
            return $this->getPdo();
        }

        if ($this->getConfig('sticky') && $this->recordsModified) {
            return $this->getPdo();
        }

        if ($this->readPdo instanceof Closure) {
            return $this->readPdo = call_user_func($this->readPdo);
        }

        return $this->readPdo ?: $this->getPdo();
    }

代码判断配置sticky 为true 并且数据修改成功返回当当前链接

Laravel 表单验证解析

laravel表单验证的异常响应

使用控制器的$this->validate($request,[‘body’ => ‘required’,]);或创建的表单请求验证时,laravel会根据ajax请求或Accept:application/json请求头自动响应Json数据,普通请求会自动重定向之前的页面

源码解析

laravel 异常处理类 HandlerIlluminate\Foundation\Exceptions\Handler

/**
 * Create a response object from the given validation exception.
 *
 * @param \Illuminate\Validation\ValidationException $e
 * @param \Illuminate\Http\Request                   $request
 *
 * @return \Symfony\Component\HttpFoundation\Response
 */
protected function convertValidationExceptionToResponse(ValidationException $e, $request)
{

        if ($e->response) {
            return $e->response;
        }

        return $request->expectsJson()
                    ? $this->invalidJson($request, $e)
                    : $this->invalid($request, $e);
}

/**
 * Convert a validation exception into a response.
 *
 * @param \Illuminate\Http\Request                   $request
 * @param \Illuminate\Validation\ValidationException $exception
 *
 * @return \Illuminate\Http\Response
 */
protected function invalid($request, ValidationException $exception)
  {
        $url = $exception->redirectTo ?? url()->previous();

        return redirect($url)
                ->withInput($request->except($this->dontFlash))
                ->withErrors(
                    $exception->errors(),
                    $exception->errorBag
                );
 }

/**
 * Convert a validation exception into a JSON response.
 *
 * @param \Illuminate\Http\Request                   $request
 * @param \Illuminate\Validation\ValidationException $exception
 *
 * @return \Illuminate\Http\JsonResponse
 */
protected function invalidJson($request, ValidationException $exception)
 {
        return response()->json([
            'message' => $exception->getMessage(),
            'errors' => $exception->errors(),
        ], $exception->status);
 }

Trait Illuminate\Http\Concerns\InteractsWithContentTypes

/**
 * Determine if the current request probably expects a JSON response.
 *
 * @return bool
 */
public function expectsJson()
{
     return ($this->ajax() && !$this->pjax()) || $this->wantsJson();
}

/**
 * Determine if the current request is asking for JSON in return.
 *
 * @return bool
 */
public function wantsJson()
{
      $acceptable = $this->getAcceptableContentTypes();

      return isset($acceptable[0]) && Str::contains($acceptable[0], ['/json', '+json']);
}

Handler 类中的convertValidationExceptionToResponse() 方法通过 expectsJson() 判断是否为ajax请求或accept请求头 然后通过invalidJson()将异常响应为json 普通请求,通过invalid()方法响应为重定向

Eloquent ORM 解析入门

参考链接https://learnku.com/docs/laravel/5.5/eloquent/1332

Laravel 的 Eloquent ORM 提供了漂亮、简洁的 ActiveRecord 实现来和数据库交互。每个数据库表都有一个对应的「模型」用来与该表交互。你可以通过模型查询数据表中的数据,并将新记录添加到数据表中。

在开始之前,请确保在 config/database.php 中配置数据库连接。更多关于数据库的配置信息,请查看 文档

艺术,优雅,强大,用过的都说好!

Eloquent 模型约定

数据表名 默认使用模型类的复数形式「蛇形命名」来作为表名 ,否则使用定义的 table属性

protected $connection = 'connection-name';//此模型的连接名称
protected $table = 'my_flights';//表名
 public $timestamps = false; //关闭自己动维护时间戳
 protected $dateFormat = 'U'; //模型日期字段存储格式 U表示unix时间戳
 const CREATED_AT = 'creation_date';  //自定义创建时间字段
 const UPDATED_AT = 'last_update';  //自定义更新时间字段
protected $primaryKey = 'id'; // 定义主键字段
protected $keyType = 'int'; //主键类型
public $incrementing = true; //是否开启auto-incrment 自增属性
 protected $fillable = []; // 可以被批量赋值的属性
 
 protected $guarded = [];  // 不可批量复制的属性
  protected $casts = ['is_admin'=>'boolean'];
  //属性转换配合修改器使用时要保持类型一致
  //转换成数组或json时的可见性
  protected $visible = ['first_name', 'last_name'];//显示
  //方法显示
  $model->makeVisible('attribute')->toArray();
  protected $hidden = ['password'];//隐藏
  //方法隐藏
  $model->makeHidden('attribute')->toArray();
protected $appends = ['is_admin']; //追加到模型数组表单的访问器。
//配合访问器
public function getIsAdminAttribute()
{
   return $this->attributes['admin'] == 'yes';
}
//运行时追加
return $model->append('is_admin')->toArray();

return $model->setAppends(['is_admin'])->toArray();

模型方法

模型的查询构造器中注入了DB的查询构造器,所以模型也支持DB查询构造器的方法.这里只解析模型查询构造器的独有方法或模型和DB的特殊方法

all() 查询所有

$flights = App\Flight::all();//查询所有结果
模型内方法,实际调用的是DB的get方法,参数是字段支持数组和多个参数形式
all方法直接创建了一个查询构造器然后执行get()方法,所以调用all方法之前无法调用任何查询构造器的方法
public static function all($columns = ['*'])
{
     return (new static)->newQuery()->get(
         is_array($columns) ? $columns : func_get_args()
     );
}

cursor() 游标遍历,适用于大数据量处理.


foreach (User::select('id', 'name')->cursor() as $user) {
   //处理操作    
   dump($user);
}

内部实现使用PHP generator 进行遍历 生成器是协程调度, 耗时和消耗内存是恒定的(接近),跟数据量无关.

 /**
  * Get a generator for the given query.
  *
  * @return \Generator
  */
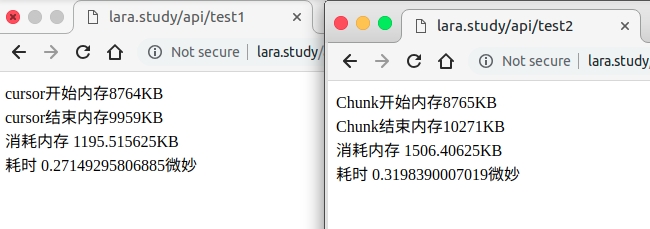
public function cursor()
{
     foreach ($this->applyScopes()->query->cursor() as $record) {
         yield $this->model->newFromBuilder($record);
     }
}

chunk() 分块处理 适用于小数据量快速处理

Flight::chunk(200, function ($flights) {
    foreach ($flights as $flight) {
        //
    }
});

内部实现 do while 循环 执行的分页查询sql 耗时和消耗内存取决分块数量,分块数量越大消耗内存和耗时相应减少

select * from `flights` order by `flights`.`id` asc limit 200 offset 0  
select * from `flights` order by `flights`.`id` asc limit 200 offset 200  
select * from `flights` order by `flights`.`id` asc limit 200 offset 400  

附上测试代码

//内存计算函数
function print_memory_info($msg, $real_usage = false)
{
    echo $msg, ceil(memory_get_usage($real_usage) / 1024), 'KB', '<br>';

    return memory_get_usage($real_usage);
}

//使用游标方式
public function test1(Request $request)
{
        $start_at = microtime(true);
        $start = print_memory_info('cursor开始内存');
        foreach (User::where('id', '<=', '10000')->cursor() as $user) {
            //dump($user->id);
        }
        $end = print_memory_info('cursor结束内存');
        $end_at = microtime(true);

        echo '消耗内存 ',($end - $start) / 1024 .'KB','<br>';
        echo '耗时 ',$end_at - $start_at,'微妙';
}

//使用chunk方式
public function test2(Request $request)
{
        $start_at = microtime(true);
        $start = print_memory_info('Chunk开始内存');
        User::where('id', '<=', '10000')->Chunk(10000, function ($users) {
            foreach ($users as $user) {
                //dump($user->id);
            }
        });
        $end = print_memory_info('Chunk结束内存');
        $end_at = microtime(true);
        echo '消耗内存 ', ($end - $start) / 1024 .'KB', '<br>';
        echo '耗时 ', $end_at - $start_at, '微妙';
}
测试结果

firstOrNew() 和 firstOrCreate() 和firstOrUpdate()

//传参支持两种方式 两个数组或一个数组 查询和写入的数据匹配为传入的数组
$user = User::firstOrNew(['name' => 'Favian Orn'], ['email' => 'max.koss@example.com']);

firstOrnew 返回的模型还尚未保存到数据库,必须要手动调用 save 方法才能保存它
如果想使用批量赋值,需要先调用fill方法
$user->fill(['name' => '1234'])->save();

$user = User::firstOrCreate(['name' => 'Favian Orn', 'email' => 'max.koss@example.com']);
$user->update(['name' => '1234']);

$user = User::firstOrUpdate(['name' => 'Favian Orn', 'email' => 'max.koss@example.com']);