 /**
  * Get a generator for the given query.
  *
  * @return \Generator
  */
public function cursor()
{
     foreach ($this->applyScopes()->query->cursor() as $record) {
         yield $this->model->newFromBuilder($record);
     }
}
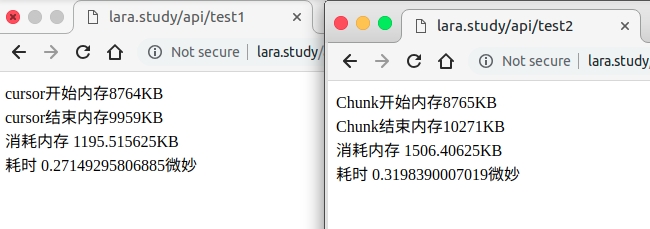
chunk() 分块处理 适用于小数据量快速处理
Flight::chunk(200, function ($flights) {
    foreach ($flights as $flight) {
        //
    }
});
内部实现 do while 循环 执行的分页查询sql 耗时和消耗内存取决分块数量,分块数量越大消耗内存和耗时相应减少
select * from `flights` order by `flights`.`id` asc limit 200 offset 0
select * from `flights` order by `flights`.`id` asc limit 200 offset 200
select * from `flights` order by `flights`.`id` asc limit 200 offset 400
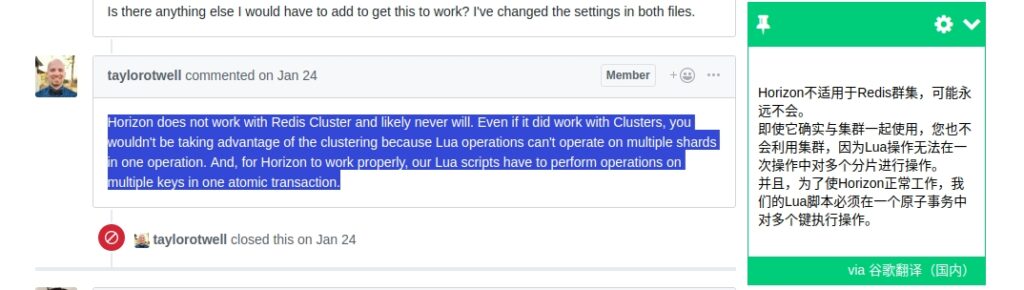
 /*
    |--------------------------------------------------------------------------
    | Horizon Redis Connection
    |--------------------------------------------------------------------------
    |
    | This is the name of the Redis connection where Horizon will store the
    | meta information required for it to function. It includes the list
    | of supervisors, failed jobs, job metrics, and other information.
    |
    */

    'use' => 'payhandle',
/*
    |--------------------------------------------------------------------------
    | Horizon Redis Prefix
    |--------------------------------------------------------------------------
    |
    | This prefix will be used when storing all Horizon data in Redis. You
    | may modify the prefix when you are running multiple installations
    | of Horizon on the same server so that they don't have problems.
    |
    */

    'prefix' => env('HORIZON_PREFIX', 'horizon:'),
/*
    |--------------------------------------------------------------------------
    | Horizon Route Middleware
    |--------------------------------------------------------------------------
    |
    | These middleware will get attached onto each Horizon route, giving you
    | the chance to add your own middleware to this list or change any of
    | the existing middleware. Or, you can simply stick with this list.
    |
    */

    'middleware' => ['web'],
/*
    |--------------------------------------------------------------------------
    | Queue Wait Time Thresholds
    |--------------------------------------------------------------------------
    |
    | This option allows you to configure when the LongWaitDetected event
    | will be fired. Every connection / queue combination may have its
    | own, unique threshold (in seconds) before this event is fired.
    |
    */

    'waits' => [
        'redis:default' => 60,
    ],
/*
    |--------------------------------------------------------------------------
    | Job Trimming Times
    |--------------------------------------------------------------------------
    |
    | Here you can configure for how long (in minutes) you desire Horizon to
    | persist the recent and failed jobs. Typically, recent jobs are kept
    | for one hour while all failed jobs are stored for an entire week.
    |
    */

    'trim' => [
        'recent' => 60,
        'failed' => 10080,
    ],
/*
    |--------------------------------------------------------------------------
    | Fast Termination
    |--------------------------------------------------------------------------
    |
    | When this option is enabled, Horizon's "terminate" command will not
    | wait on all of the workers to terminate unless the --wait option
    | is provided. Fast termination can shorten deployment delay by
    | allowing a new instance of Horizon to start while the last
    | instance will continue to terminate each of its workers.
    |
    */

    'fast_termination' => false,
/*
    |--------------------------------------------------------------------------
    | Queue Worker Configuration
    |--------------------------------------------------------------------------
    |
    | Here you may define the queue worker settings used by your application
    | in all environments. These supervisors and settings handle all your
    | queued jobs and will be provisioned by Horizon during deployment.
    |
    */

    'environments' => [
        'production' => [
            'supervisor-1' => [
                'connection' => 'redis',
                'queue' => ['default'],
                'balance' => 'simple',
                'processes' => 10,
                'tries' => 3,
            ],
        ],

        'local' => [
            'supervisor-1' => [
                'connection' => 'redis',
                'queue' => ['default'],
                'balance' => 'simple',
                'processes' => 3,
                'tries' => 3,
            ],
        ],
    ],
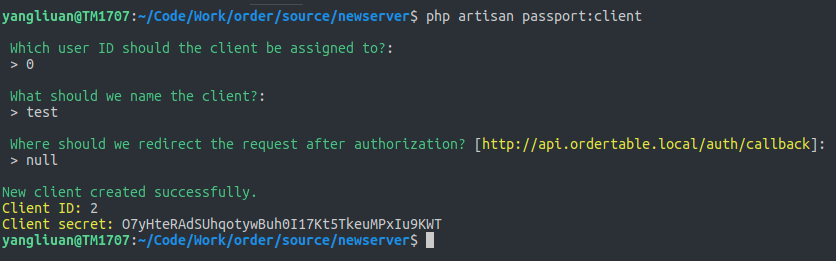
<?php

namespace App\Providers;

use DateInterval;
use Illuminate\Foundation\Support\Providers\AuthServiceProvider as ServiceProvider;
use Laravel\Passport\Bridge\PersonalAccessGrant;

class AuthServiceProvider extends ServiceProvider
{
    /**
     * The policy mappings for the application.
     *
     * @var array
     */
    protected $policies = [
        'App\Model' => 'App\Policies\ModelPolicy',
    ];

    /**
     * Register any authentication / authorization services.
     */
    public function boot()
    {
        $this->registerPolicies();
        //设置个人token失效时间为7天
        $authorizarionServer = app()->make(\League\OAuth2\Server\AuthorizationServer::class);
        $authorizarionServer->enableGrantType(
            new PersonalAccessGrant(),
            new DateInterval('PT7D')
        );
    }
}